2011年11月30日 星期三
2011年11月24日 星期四
BOSCH Tassimo T46
一直想買台咖啡機,目前膠囊式咖啡機主要看到的有兩種系統 T-Disc 跟 K-Cup (NESPRESSO 比較貴,不理它),老婆公司用的是 K-Cup,不過我還是比較喜歡 BOSCH 的機型。今天去 COSTCO 看到原來要將近 130 的 Bosch Tassimo T46,只要 96 塊,馬上搬一台回家。
1. BOSCH Tassimo T46,另外還買盒 T-Disc。


1. BOSCH Tassimo T46,另外還買盒 T-Disc。

2. 全部拆開來的樣子。

3. 杯子放上去剛剛好,如果有較高的手拿杯,底座可以移開。右邊是水槽,水槽還有附個濾水的東西,裝水後放在機器後面,大概可以有 4 杯的量。

4. 蓋子打開,放上 T-Disc,壓下,按開關,咖啡就慢慢流出來了,糖跟奶精自己加。

5. T-Disc 的長相,以後再去試不同口味的。

用後感想:
1. 還是沒有現磨的咖啡好喝,但是適合我這種懶人。
2. 咖啡沖出來還滿香,但是味道有點淡,水量可能要調整下。
2011年11月4日 星期五
Windows Metro style app 之 "Hello World!"
既然安裝了 Windows 8 Developer Preview ,不能免俗的 "Hello World!" 一下。
本文是參考此篇:Getting started with Windows Metro style app development,加幾張圖給沒用過 Visual Studio 的朋友看。
預裝的版本為:Windows 8 Developer Preview with developer tools English, 64-bit (x64),安裝方式請參考 Windows 8 Developer Preview 安裝 (一)。
原文內文請自行參考,直接開始:
1. 點擊 [Visual Studio 11 Express]。

2. Visual Studio 11 Express 開起來後,點選 1 [New Project...],點擊 2 [Visual C#] --> [Windows Metro style],選擇 3 [Application],最後把 Project Name 改成 4 "Hello World"。

3. 將以下程式碼輸入至 <Grid x:Name="LayoutRoot" Background="#FF0C0C0C"> </Grid>之間 (請不要偷懶,一個字母一個字母打)。打完之後,上方黑色窗格就會出現 [Click Me!] Button。
-------------------------------------------------------------------------------------------------------------------------
<Grid.RowDefinitions>
<RowDefinition/>
<RowDefinition/>
</Grid.RowDefinitions>
<Button Grid.Row="0" Grid.Column="0" Name="myButton" Click="changeText">Click Me!</Button>
<TextBox Grid.Row="1" Grid.Column="0" Name="myTextBox" />
-------------------------------------------------------------------------------------------------------------------------


4. 點擊兩下 [Click Me!] Button,就會出現 [MainPage.xaml.cs] code-behind 視窗。在紅色圈起來的地方加入以下程式碼 (最後分號不要忘)。
-------------------------------------------------------------------------------------------------------------------------
myTextBox.Text = "Hello Windows Metro style apps with XAML!";
-------------------------------------------------------------------------------------------------------------------------


5. 按下鍵盤的 [F5],進入 Debug 模式,Hello World 程式就會出現了。按下 [Click Me!],下方就會出現 "Hello Windows Metro style apps with XAML!"。

6. 關閉程式。按下鍵盤的 [Win] 鍵 ( [Ctrl] 及 [Alt] 中間),回到主畫面,再點 [Visual Studio 11 Express],再同時按下鍵盤 [Shift] + [F5],就可以停止 Debug 模式。
主畫面拉到最右邊,可以看到剛才的程式。


6. 關閉程式。按下鍵盤的 [Win] 鍵 ( [Ctrl] 及 [Alt] 中間),回到主畫面,再點 [Visual Studio 11 Express],再同時按下鍵盤 [Shift] + [F5],就可以停止 Debug 模式。
主畫面拉到最右邊,可以看到剛才的程式。

2011年11月3日 星期四
Windows 8 Developer Preview 關機
安裝完 Window 8 後,相信大家的感覺都是非常的平板,鍵盤中的 [Win] 變得非常重要。
不知道是不是設計上就不想讓人關機,[Power] 跑到哪裡去了呢?
1. 請把滑鼠移到左下角就會出現 Start 選單,接著按下 [Settings]。

2. 接下來右側就會出現 Settings 選單,右下角圈起來的地方就是 [Power] 鍵了。

不知道是不是設計上就不想讓人關機,[Power] 跑到哪裡去了呢?
1. 請把滑鼠移到左下角就會出現 Start 選單,接著按下 [Settings]。

2. 接下來右側就會出現 Settings 選單,右下角圈起來的地方就是 [Power] 鍵了。

安裝 Windows 8 Developer Preview 後,舊系統不見了
測試系統的安裝,最好都在 VM 下完成。當然,也不是不能安裝在硬碟的 Partition 中,與舊系統共存。這裡建議安裝在新切出來的 Partition 上,不要跟舊系統放在一起。
安裝完後,如果發現開機表單中沒有舊系統選項,直接在 Windows 8 開機。可以在 [Default operating system] 中設定。
1. 開機完成登入後,請點選 [Control Panel],拉到最下面,點選 [More settings]。

2. 出現 Control Panel 視窗後,點選 1 [System and Security] --> [System]。再點選 2 [Advanced system settings]。出現 System Properties 視窗後,點選 3 Startup and Recovery [Settings...]。

3. 在 System startup 下的 Default operating system 下拉式選單,選擇 [Earlier Version of Windows] 後,按下 [OK]。

重新開機後,就可以看到多重開機選單了。
註:Windows 8 在 PC 上的安裝非常神奇,什麼 drivers 都不用上,就全部安裝完畢了。
Windows 8 Developer Preview 安裝 VMware Tools
在 VMware Player 安裝完 Windows 8 Developer Preview 後,再安裝 VMware Tools 可以有更好的體驗。
1. 按下標題列上的 [Virtual Machine] 後,再按下 [Install VMware Tools...]。

2. VMware Tools 會自動開始安裝,如果看不到,請按下鍵盤的 [Win] 鍵。([Ctrl] 跟 [Alt] 中間)
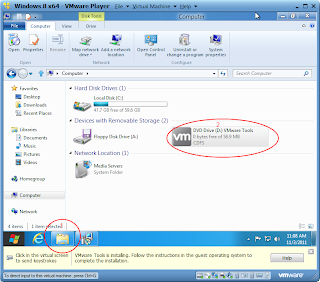
回到原始桌面畫面,先選 1 [檔案總管],再選擇 2 [DVD Drive (D:) VMware Tools]。
3. 按下 [Next >]。

4. 點選 [Complete],按下 [Next >]。

5. 按下 [Install]。

6. 按下 [Finish] 後,重新開機就可以了。


1. 按下標題列上的 [Virtual Machine] 後,再按下 [Install VMware Tools...]。

2. VMware Tools 會自動開始安裝,如果看不到,請按下鍵盤的 [Win] 鍵。([Ctrl] 跟 [Alt] 中間)
回到原始桌面畫面,先選 1 [檔案總管],再選擇 2 [DVD Drive (D:) VMware Tools]。

3. 按下 [Next >]。

4. 點選 [Complete],按下 [Next >]。

5. 按下 [Install]。

6. 按下 [Finish] 後,重新開機就可以了。

畫面是不是更好看了呢?

Windows 8 Developer Preview 安裝時需要 ProductKey 問題
當用 VMware Player 安裝 Windows 8 Developer Preview,有時會出現 [Windows cannot read the ProductKey setting from the unattend answer file.] 訊息 (比如多次安裝):


這時請:
1. Power off VMware Player,按下 [Yes]。

2. 選擇 [Edit virtual machine settings]。

3. Remove [Floppy],按下 [OK] 。

4. 回主畫面點選 [Play virtual machine],就可以繼續安裝下去。
Windows 8 Developer Preview 安裝 (二)
接續 Windows 8 Developer Preview 安裝 (一)


16. 輸入電腦名稱。

17. 一般設定,選擇 [Customize]。

18. 選擇 [Yes, share and connect]。

19. 根據需求自行調整,按 [Next]。

20. 根據需求自行調整,如果不想 Send 東西到 Microsoft,把開關關掉就好了,按 [Next] 繼續。

21. 根據需求自行調整,按 [Next]。

22. 選擇 [Don't want to log on with a Windows Live ID?]。

23. 選擇 [Local account]。

24. 輸入 User name 及 Password,按 [Next]。

25. 安裝完畢,感覺一下 Metro style。

接下來可以安裝 VMware Tools 讓整個畫面更完整。
Windows 8 Developer Preview 安裝 (一)
Windows 8 Developer Preview 版九月份就出來了,這幾天看起來沒什麼災情,就裝起來看看 Metro style 用起來感覺如何。
準備工作:
1. 安裝 VMware Player。
2. 下載 Windows 8 Developer Preview,請自行 Review 下載網頁的注意事項。
2.1 如果想安裝後寫點程式玩玩,請下載 Windows 8 Developer Preview with developer tools English, 64-bit (x64)。
2.2 如果只想看看 Windows 8 是什麼碗公,請下載 Windows 8 Developer Preview English, 64-bit (x64) / Windows 8 Developer Preview English, 32-bit (x86)。
2.3 如果想直接安裝在電腦中,不要用 VMware Player,可以用 Windows Disc Image Burner 燒成光碟再安裝。但是請注意如果是下載 with developer tools 的檔案要用 DVD-9 燒。
安裝電腦:
ThinkPad T410
OS : Windows 7 Pro
Memory : 8GB
HD : 500GB
安裝步驟:
1. 開啟 VMware Player,選擇 [Create a New Virtual Machine]。

2. Install from: [Installer disc image file (iso)],點擊 [Browse...],找到之前下載的檔案,按下 [Next >]。

3. Windows 8 還沒上市,選擇 [Microsoft Windows],Version [Windows 7 x64]。

序號可以不輸入,直接按 [Next]。

4. 把名字改成 "Windows 8 x64",Location 使用預設。

5. [Maximum disk size (GB)] 輸入 "60",點選 [Store virtual disk as a single file]。

6. 點選 [Customize Hardware]。

7. Memory 調成 [2048] (之前試過 1024 跑起來有點鈍),按下 [Close]。

8. 按下 [Finish]。
9. 開始安裝畫面。

10. 按下 [Next]。

11. 按下 [Install now]。

12. 點選 [I accept the license terms],按下 [Next]。

13. 選擇 [Custom (advanced)] 全新安裝。
注意: [Upgrade] 選項是在你已經有 Windows 想要升級。不建議如此做,因為 Download 網頁有個注意事項:"Note: You can't uninstall the Windows 8 Developer Preview. To go back to your previous operating system, you must reinstall it from restore or installation media."。

14. 按下 [Next]。

15. 開始安裝。

接續 Windows 8 Developer Preview 安裝 (二) 安裝設定。
PS. 如果出現需要 ProductKey 的畫面,請參照 Windows 8 Developer Preview 安裝時需要 ProductKey 問題。
訂閱:
文章 (Atom)