顯示具有 Windows 8 標籤的文章。 顯示所有文章

2013年8月27日 星期二

How to setup Windows 8 VPN?

Create VPN Connection
1. [Win]+[x] –> “Control Panel” –> ”Network and Internet”

2. Click “Network and Sharing Center”.

3. Click “Set up a new connection or network”.

4. Select “Connect to a workplace”.

5. Select “Use my Internet connection (VPN)".

6. Type your VPN Server Internet address and Destination name. Click [Create].

Use VPN Connection
1. [Win]+[i] –> Network

2. Click [Connect] and type your User name and Password.


2012年10月17日 星期三

Windows 8 Pre-order

1. $14.99 (no DVD, upgrade), If you buy a qualifying Windows 7 PC between 2 June 2012 and 31 January 2013, you can purchase a download of Windows 8 Pro at a special promotional price that varies by region.

2. $39.99 (no DVD, upgrade), if you want to wait until October 26th you will be able to upgrade online via Windows.com using the Windows 8 Upgrade Assistant. Upgrade from Windows XP SP3, Windows Vista, or Windows 7 to Windows 8 Pro.

3. $69.99 (packaged DVD, upgrade), Pre-order from now to October 26th.

4. $69.99 (no DVD, upgard), Pack Product Key only, Pre-order from now to October 26th.

5. $99.99 Windows 8 (Full Version).

6. $139.99 Windows 8 Professional (Full Version).


2012年6月1日 星期五

Windows 8 Release Preview 出來了

Windows 8 Release Preview (應該就是 RC 版本) 可以在這裡下載:
http://windows.microsoft.com/en-US/windows-8/release-preview?ocid=O_MSC_W8R_OandO_Dev_EN-US


下載完不要太興奮,先看看 Faq,再決定用哪種方式安裝。

2012年2月29日 星期三

Windows 8 Consumer Preview 初體驗

Windows 8 整個操作起來非常的平板,如果用過 Windows Phone,應該可以馬上就上手。

 [Win Key] 是非常重要的按鍵,可以在各個 Apps 切換。還有基本的操作像是滑鼠移到左下角,會出現 Start Window,滑鼠再往上移,可以選之前執行過的 Apps。 


滑鼠再移到右下角,會出現 [Search], [Share], [Start], [Devices] 及 [Settings],桌面上也會有時間跟日期。

按下 [Search]  可以看到有那些 Apps 可以用。

直接來看看幾個 Apps 的畫面:
1. Store 終於有東西可以下載了。

2. Xbox LIVE Games

3. Photos 可以同步好幾個帳號。

4. Calendar 會跟 Live 的帳號同步。


5. Messaging 像手機的對話模式。

6. People 可以整合數個帳號的聯絡人。

7. Weather 下雪了。

8. Finance

9. Reader 可支援的格式還不是太多。

當執行過一些 Apps 後,動態磚上就會顯示即時訊息,非常有用。 

感想:
1. 整體操作順暢,資訊簡潔清楚,可以包含多年齡層的使用者。(我不是說 iPad)
2. 未來的概念大概是所有資料都上雲端,各個設備間 (電腦、手機...) 的同步都會到雲端。(公有雲及私有雲)
3. 純粹猜想一下,如果所有電腦、筆電的螢幕都能觸控的時候,Windows 8 應該可以成長很快。

但是 (一定要有個但是),對於一些傳統使用者,或是每天坐辦公桌的人來說,只是要用用 Office,再到 ERP 打打單,不需要這些會分心的東西吧。不知道會不會有個簡潔的 Workstation 版本。

後記:
安裝完 Windows 8 之後,馬上把 Nokia Lumia 710 接上去看看有什麼事發生,結果什麼也沒發生,後來看了一下 PC settings 有找到 Lumia 710,但似乎出了什麼問題。
 再看一下 Action Center 的 Maintenance,原來還要另外裝 Zune,算了吧。


Windows 8 Consumer Preview 安裝 (一)

Windows 8 Consumer Preview 在二月底出來了,安裝體驗一下吧。


準備工作:
1. 安裝 VMware Player。
2. 下載 Windows 8 Consumer Preview,請自行 Review 下載網頁的注意事項。
注意:非正式版本,不要裝在工作環境。


安裝電腦:
ThinkPad T410
OS : Windows 7 Pro
Memory : 8GB
HD : 500GB


安裝步驟:
1. VMware Player 安裝設定請參照 Windows 8 Developer Preview 安裝 (一) 步驟 1-8。
2. 開始安裝畫面,出現一條魚,跟 Developer Preview 不一樣了。


3. 這部分還是一樣,底色深了點,按 [Next]。 


4. 按 [Install now]。 


5. 這版本要輸入 product key,下載網頁有。


6. 瀏覽下 License terms,勾選 [ I accept the licence terms ],按下 [Next]。 


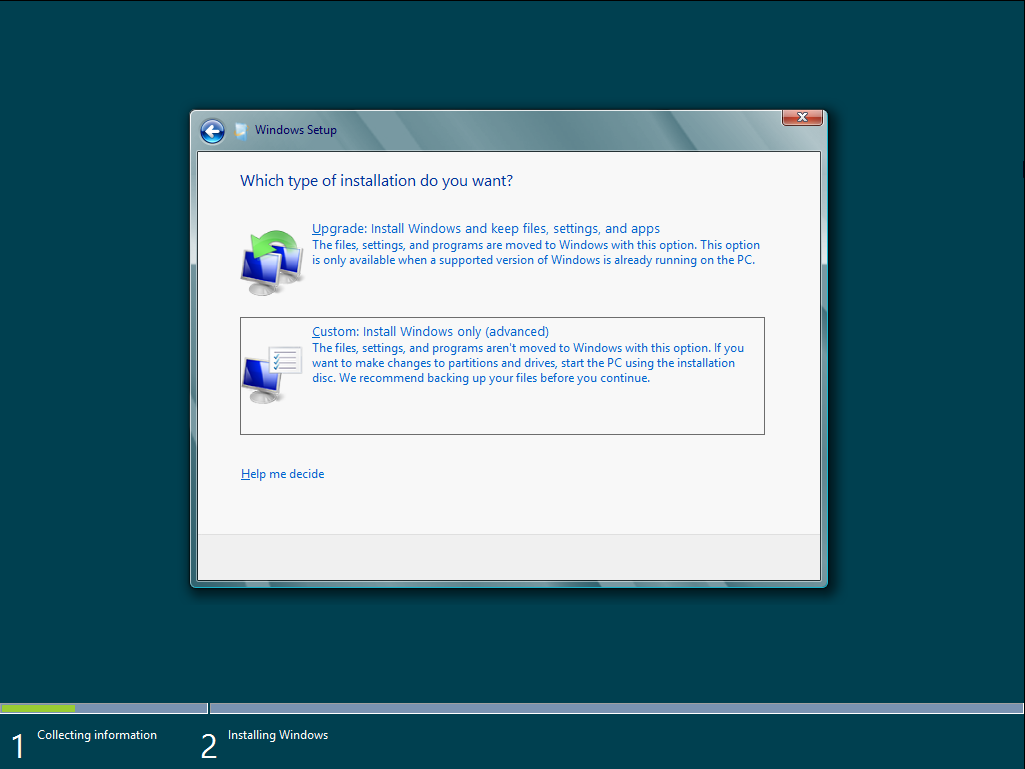
7. 新安裝,選 [Custom: Install Windows only (advanced)]。 


8. 按下 [Next]。 


9. 開始自動安裝。


接續 Windows 8 Consumer Preview 安裝 (二) 安裝設定。
PS. 如果出現需要 ProductKey 的畫面,請參照 Windows 8 Developer Preview 安裝時需要 ProductKey 問題。

Windows 8 Consumer Preview 安裝 (二)

接續 Windows 8 Consumer Preview 安裝 (一) 


10. 選擇背景顏色,輸入 PC name,按下 [Next]。


11. 看看有什麼可以設定的,按下 [Customize]。 


12. 選擇 [Yes, turn on sharing and connect to devices]。 


13. 可以自行設定或直接按 [Next]。 


14. 自行設定 On/Off,然後按下 [Next]。(有一項不能改)


15. 自行設定 On/Off,然後按下 [Next]。(第一項不能改)


16. 如果有 Windows Live Account 可以直接輸入,可以跟該帳戶同步資料,也可以直接按下 [Next]。


17. 個人化設定中。


18. 不到一小時就安裝完了,速度滿快的。

2011年11月4日 星期五

Windows Metro style app 之 "Hello World!"

既然安裝了 Windows 8 Developer Preview ,不能免俗的 "Hello World!" 一下。 


本文是參考此篇:Getting started with Windows Metro style app development,加幾張圖給沒用過 Visual Studio 的朋友看。 
預裝的版本為:Windows 8 Developer Preview with developer tools English, 64-bit (x64),安裝方式請參考 Windows 8 Developer Preview 安裝 (一)。 


原文內文請自行參考,直接開始:
1. 點擊 [Visual Studio 11 Express]。


2. Visual Studio 11 Express 開起來後,點選 1 [New Project...],點擊 2 [Visual C#] --> [Windows Metro style],選擇 3 [Application],最後把 Project Name 改成 4 "Hello World"。 


3. 將以下程式碼輸入至 <Grid x:Name="LayoutRoot" Background="#FF0C0C0C"> </Grid>之間 (請不要偷懶,一個字母一個字母打)。打完之後,上方黑色窗格就會出現 [Click Me!] Button。 
-------------------------------------------------------------------------------------------------------------------------
    <Grid.RowDefinitions>
        <RowDefinition/>
        <RowDefinition/>
    </Grid.RowDefinitions>
    <Button Grid.Row="0" Grid.Column="0" Name="myButton" Click="changeText">Click Me!</Button>
    <TextBox Grid.Row="1" Grid.Column="0" Name="myTextBox" />
-------------------------------------------------------------------------------------------------------------------------

4. 點擊兩下 [Click Me!] Button,就會出現 [MainPage.xaml.cs] code-behind 視窗。在紅色圈起來的地方加入以下程式碼 (最後分號不要忘)。
-------------------------------------------------------------------------------------------------------------------------
    myTextBox.Text = "Hello Windows Metro style apps with XAML!";
-------------------------------------------------------------------------------------------------------------------------

5. 按下鍵盤的 [F5],進入 Debug 模式,Hello World 程式就會出現了。按下 [Click Me!],下方就會出現 "Hello Windows Metro style apps with XAML!"。

6. 關閉程式。按下鍵盤的 [Win] 鍵 ( [Ctrl] 及 [Alt] 中間),回到主畫面,再點 [Visual Studio 11 Express],再同時按下鍵盤 [Shift] + [F5],就可以停止 Debug 模式。

主畫面拉到最右邊,可以看到剛才的程式。

2011年11月3日 星期四

Windows 8 Developer Preview 關機

安裝完 Window 8 後,相信大家的感覺都是非常的平板,鍵盤中的 [Win] 變得非常重要。
不知道是不是設計上就不想讓人關機,[Power] 跑到哪裡去了呢?
1. 請把滑鼠移到左下角就會出現 Start 選單,接著按下 [Settings]。 


2. 接下來右側就會出現 Settings 選單,右下角圈起來的地方就是 [Power] 鍵了。